Intro
My homelab journey began in 2013 with a humble Raspberry Pi, the very first model. I was needing a cheap machine for my first step into the world of Linux. It helped me a lot to dive into this technology and served me as a basic NAS, thank you Vezpibox (shitty name, I know)
In 2015, I upgraded to a Raspberry Pi 2, seeking better performance to run multiple applications like XBMC (the old Kodi’s name), CouchPotato, SickBeard… 😇
By 2018, the need for more RAM led me to a Raspberry Pi 3, allowing me to run even more applications. My 3 little machines were running happily together, in a quite ordered mess.
Finally, in 2019, my new job made me experiment the virtualization, with virtual machines and above all Docker. I wanted to try that at home, I took a significant step forward with a compact yet quite powerful headless mini PC that laid the foundation of my homelab.
Why a Homelab ?
I wanted my own playground, a space where I could build but also safely break things, learn to fix them, and gain a deeper understanding of how they work.
My single server was great, but testing anything risky on it became a problem. It was running critical services like home automation or DNS, when it was down, everything was down. The server had become indispensable, and believe me, having no lights or internet is a major incident in my family. Not so fun anymore.
The first big challenge I set for myself was building a Kubernetes cluster. Sure, I could run one on a single node, but what’s the point of a cluster with only one node? You could argue that running Kubernetes to control my shutters is overkill, and you’d be right. But that wasn’t the point.
I also wanted to spawn new virtual machines at will, rebuild them from scratch, and apply Infrastructure as Code principles. I could have done all of that in the cloud, but I wanted full control.
Initially, my goal was to provide high availability for my existing services. One server wasn’t enough. So, I wanted a second node. But in most HA setups, three nodes are the sweet spot. And just like that, I was on my way to building what would become my homelab.
Shaping the Lab
First, I needed to define what my homelab was actually supposed to do. I wanted it to host my existing services reliably, but that wasn’t enough, I wanted a true playground, capable of simulating a more complex enterprise environment.
Blueprint
That meant:
- High Availability: Three nodes to ensure that no single point of failure would bring everything down.
- Distributed Storage: Data redundancy across nodes, not just for uptime but also to learn how enterprise-grade storage systems work.
- Network Segmentation: Multiple VLANs to mimic real-world network topologies, isolate services, and practice advanced networking.
Constraints
Of course, reality doesn’t always align with ambitions. Here’s what I was up against:
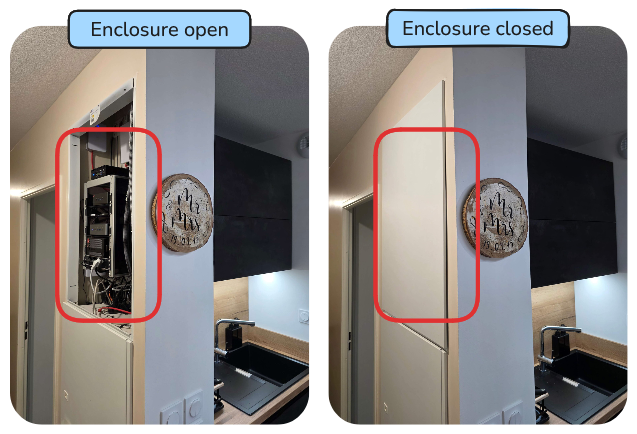
- Space: My lab needed to fit in a small, hidden service enclosure in the middle of my apartment. Not exactly a server room.
- Noise: Silence was crucial. This wasn’t going to be tucked away in a garage or basement, it was right in the middle of our living space.
- Power Draw: Running 24/7, the power consumption had to be kept in check. I couldn’t afford to triple my electric bill just to tinker with VMs.
- Budget: I wasn’t going to drop thousands on enterprise-grade hardware. The balance was finding reliable, second-hand gear that wouldn’t break the bank.
- Temperature: I’m not gonna lie, I hadn’t thought of it… Mini PCs don’t generate much heat, but network gear? That’s a different story. Lesson learned.
In a nutshell, I wanted to build a tiny datacenter in a closet.
Infrastructure Overview
Let’s break down the components that make up my homelab.
Rack
What is a datacenter without a rack? Honestly, I didn’t think one would fit in my limited space, until I discovered the DeskPi RackMate T1.
This beauty was the perfect match. The size was spot-on, the build quality impressive, and the modular design allowed me to add some extra accessories, like a power strip and shelves, to complete the setup.
Servers
I already had one server that served as the cornerstone of my homelab, and I wanted to keep it. But it had two major drawbacks:
- Single Network Interface: I wanted at least two NICs for network segmentation and redundancy.
- Aging Hardware: It was over five years old, and its compatibility options were becoming limited.
For the missing NIC, I considered a USB adapter but then stumbled upon a better solution: using the internal M.2 port, originally meant for a WiFi module, to connect a 2.5Gbps adapter. It was a perfect fit.
Regarding hardware, my existing server was powered by an AM4 Ryzen 3 2200G with 16GB of RAM DDR4. To keep things consistent and simplify compatibility, I decided to stick with the AM4 socket for all nodes.
The specifications for the two additional nodes were clear: an AM4 socket for consistency, low power consumption, dual NICs with at least one 2.5Gbps, and sufficient storage options, at least one M.2 NVMe slot and a 2.5" drive bay. Since AM4 is somewhat dated, newer models were off the table, a good news for my budget, as I was able to buy second-hand mini PCs.
Here is the specs of my nodes:
| Node | Vertex | Apex | Zenith |
|---|---|---|---|
| Model | ASRock DeskMini A300 | Minisforum HM50 | T-bao MN57 |
| CPU | AMD Ryzen 3 2200G 4C/4T | AMD Ryzen 5 4500U 6C/6T | AMD Ryzen 7 5700U 8C/16T |
| TDP | 65W | 15W | 15W |
| RAM | 16GB | 16GB | 32GB |
| NIC | 1Gbps (+ 2.5Gbps) | 1Gbps + 2.5Gbps | 1Gbps + 2.5Gbps |
| M.2 | 2 | 1 | 1 |
| 2,5" | 2 | 2 | 1 |
Each node follows the same disk layout: a 256GB SSD in the 2.5" bay for the operating system and a 1TB NVMe drive for data storage.
Network
For the network, I had two main objectives: implement VLANs for network segmentation and manage my firewall for more granular control. Since my nodes were equipped with 2.5Gbps NICs, I needed switches that could handle those speeds, and a few Power over Ethernet (PoE) ports for my Zigbee antenna and what could come after.
Initially, I was drawn to MikroTik hardware, great for learning, but their switch layouts didn’t quite align with my setup. On the other hand, Ubiquiti’s UniFi line was the easy route with their with a sleek UI and impressive hardware aesthetics.
For the router, I opted against the UniFi gateway. I wanted something more customizable, something I could get my hands dirty with. After some research, I settled on OPNsense over pfSense, it was said to be a bit more beginner-friendly, and so far, I haven’t regretted it.
Here is the final network setup:
- Router: OPNsense running on a fanless Topton box with an Intel N100, 16GB RAM, and 4x 2.5Gbps ports.
- Switch: UniFi Switch Lite 16 PoE, 8x 1Gbps PoE ports and 8x non-PoE ports.
- Switch: UniFi Flex Mini 2.5G, 5x 2.5Gbps ports, with one PoE-in port.
- Access Point: UniFi U7 Pro Wall, Wi-Fi 7, 2.5Gbps PoE+ in.
Storage
While I don’t have massive storage requirement, I still needed a flexible setup to either store my homelab workload and my personal media and documents.
Each Proxmox node is equipped with a 256GB SATA SSD for the operating system, ISO files, and VM/LXC templates. For the workload storage, I added a 1TB NVMe drive per node, which forms the basis of my Ceph cluster. This gives me distributed, redundant, and high-performance storage for VMs and containers, which allows live migration and high availability across the cluster.
Originally, my first server had two 1TB HDDs installed internally. Because I needed a slot for the SSD, I moved them outside the case using USB-to-SATA adapters and reconnected them to the same node. These drives store my photos, Nextcloud documents and backups, less performance-critical data that doesn’t need to sit on Ceph. They are served on the network using a NFS server sitting in a LXC container on that node.
Cooling
I quickly learned that my network gear was turning my closet into a mini furnace. Fortunately, I started the build in December, so the heat wasn’t too noticeable, but come summer, it was bound to become a real problem.
Options were limited, there was no way I was going to convince my wife that our servers needed a cooling system. Plus, it had to be silent. Not an easy combo.
The best solution I came up with was to drill two 40mm holes above the kitchen cabinet. I ran PVC pipes through the wall and installed two small fans, each cushioned with foam to minimize vibrations and keep noise down.
Inside the rack, I also added two 80mm fans to help with airflow. To keep everything quiet, I hooked up a PWM controller to regulate fan speeds, striking a balance between airflow and silence.
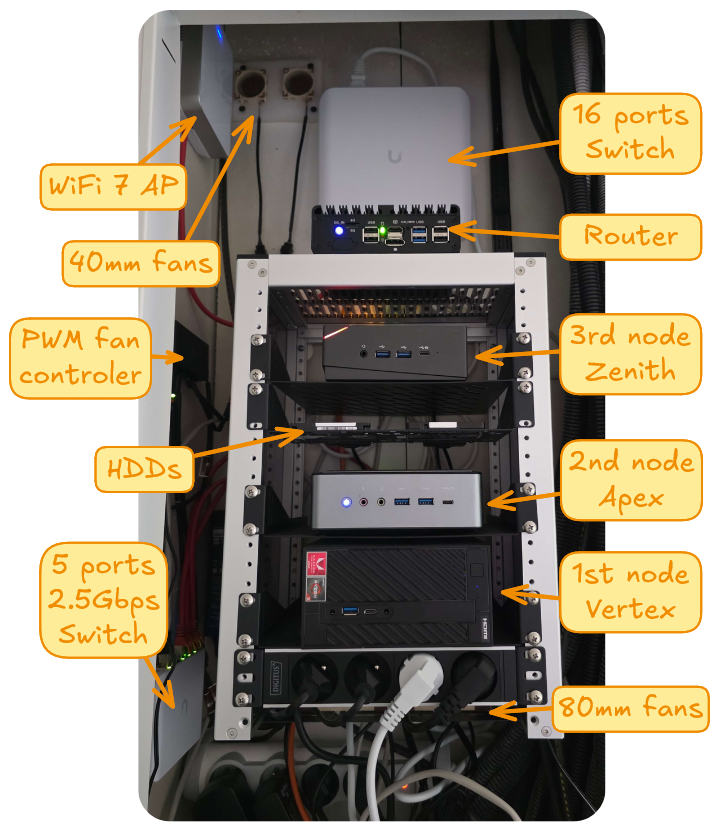
Photos
Here what is look like:
Software Stack
With the hardware foundation set, the next step was to decide what software would orchestrate everything, the real engine behind every experiment, deployment, and learning opportunity.
Hypervisor
At the core of my setup is a 3-node Proxmox VE 8 cluster, a KVM-based hypervisor that also supports LXC containers. Built on Debian, it provides essential features like live migration, HA, and seamless Ceph integration right out of the box.
For now, I’m primarily running just one VM and one LXC container. The VM is essentially a clone of my old physical server, hosting most of my applications as Docker containers. The LXC container serves as a simple jump server.
Network
The objective for my network was to implement VLANs for segmentation and manage firewall rules directly to simulate more complex setups.
Router and Firewall
At the heart of this network is OPNsense, running on a dedicated fanless box. The ISP router is in bridge mode, passing all traffic to OPNsense, which handles all routing and firewall duties. Inter-VLAN traffic is restricted, explicit firewall rules are mandatory, only the management VLAN having access to other segments.
L2 Network
Layer 2 networking is managed by UniFi switches, chosen for their sleek UI and simplicity. The UniFi controller, which manages the devices configuration, runs as a plugin on OPNsense.
The access point is broadcasting 2 SSIDs, one for my family’s laptops and cellulars (5 and 6Ghz) and the other only in 2.4Ghz for everything else (IoT, vacuum, AC, printer, Chromecast, etc.)
A 2.5Gbps UniFi switch is dedicated to Ceph storage communications, isolating storage traffic to prevent interference with other networks.
I set up LACP (Link Aggregation) between the router and the main switch at 1Gbps, hoping to double bandwidth. Reality check: a single session will only use one link, meaning that a single download will still cap at 1Gbps.
VLANs
To segment traffic, I divided the network into several VLANs:
| Name | ID | Purpose |
|---|---|---|
| User | 13 | Home network |
| IoT | 37 | IoT and untrusted equipments |
| DMZ | 55 | Internet facing |
| Lab | 66 | Lab network, trusted |
| Heartbeat | 77 | Proxmox cluster heartbeat |
| Mgmt | 88 | Management |
| Ceph | 99 | Ceph |
| VPN | 1337 | Wireguard network |
Each VLAN has its own DHCP pool managed by OPNsense, excepted the Heartbeat and Ceph ones.
DNS
DNS is structured in two layers within OPNsense:
- ADguard Home: ads and trackers filters, serves every client on the network over plain DNS on port 53
- Unbound DNS: recursive DNS, serves only the ADguard Home DNS service locally
Reverse Proxy
Caddy runs as a plugin on OPNsense and acts as the main entry point for web traffic. It routes requests based on subdomains and automatically handles HTTPS certificates and drops internal service access coming from the WAN.
Most services are still managed by a Traefik instance running on my VM. In those cases, Caddy simply forwards HTTPS requests directly to Traefik.
This two-layer proxy setup centralizes SSL certificate management in Caddy while preserving flexible and dynamic routing internally with Traefik.
VPN
For secure remote access, I configured WireGuard on OPNsense. This lightweight VPN provides encrypted connectivity to my lab from anywhere, allowing management of all my services without exposing them all directly to the internet.
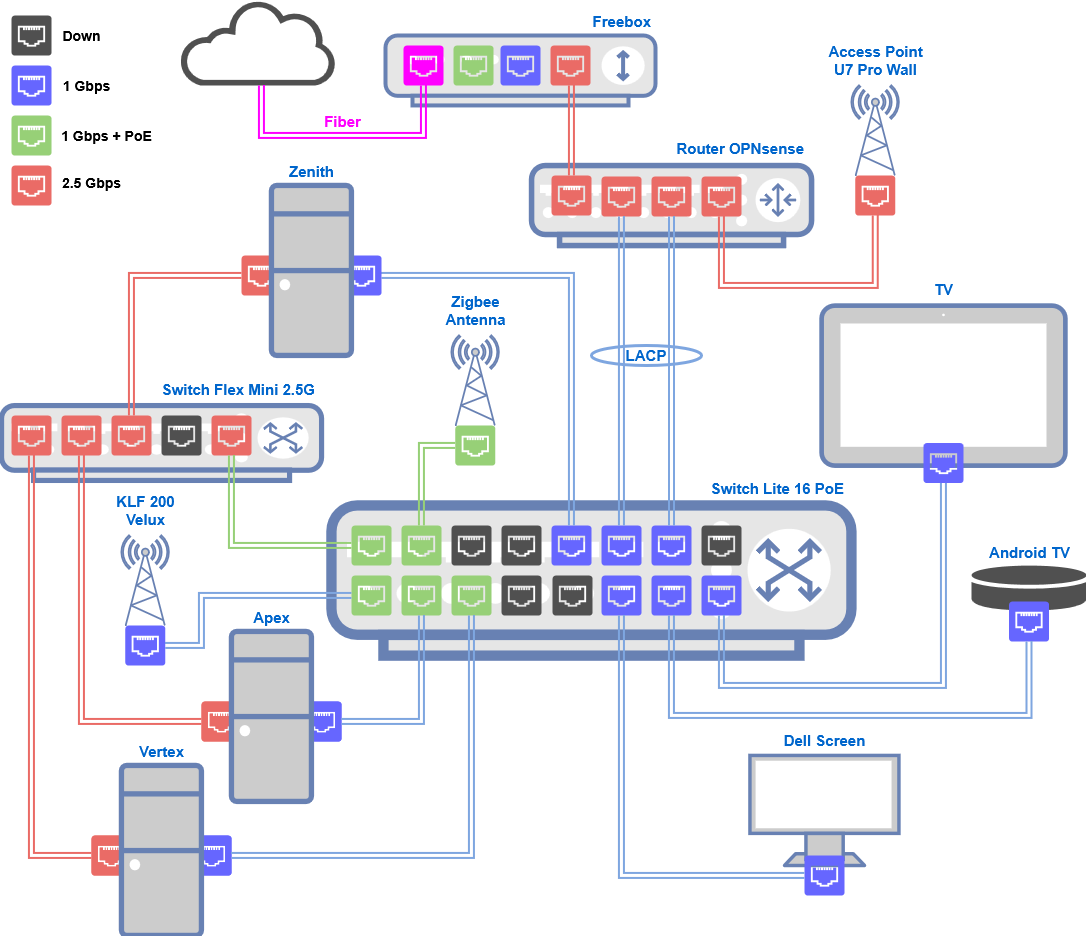
Network Diagram
Application
Let’s dive into the fun part! What started as a modest setup meant to serve a few personal needs quickly turned into a full ecosystem of open source services, each solving a specific need or just satisfying curiosity.
Here’s an overview of what’s currently running in my homelab:
- Home Assistant: Central hub for home automation, integrating smart devices and routines.
- Vaultwarden: Lightweight alternative to Bitwarden for managing and syncing passwords securely.
- Nextcloud: Self-hosted cloud storage.
- Gitea: Git repository solution for managing my code and projects.
- Blog: My Hugo-based personal blog, which you are reading now.
- Immich – Photo and video management app, similar to Google Photos.
- Jellyfin: Media server for streaming movies and shows.
- ARR Stack: Automated media acquisition tools. (Radarr, Sonarr, Torrent, etc.)
- Duplicati: Encrypted backup solution for my important data and configs.
- Prometheus: Monitoring and metrics collection tool, used with Grafana for dashboards.
- Portainer: Web interface for managing Docker containers and stacks.
- Umami: Privacy-focused analytics for tracking visits on my blog.
- phpIPAM: IP address management tool for keeping my VLANs and subnets organized.
Docker
Docker was the real game-changer in my self-hosted journey. Before containers, managing multiple services on a single server felt like a constant battle with dependencies and conflicts. Now, every service runs neatly, managed with Docker Compose inside a single VM. Traefik dynamically handles reverse proxy, simplifying access and SSL certificates.
Kubernetes
My next big challenge is to take container orchestration to the next level. While Docker Swarm could meet the technical need, my primary goal is to gain hands-on experience with Kubernetes, and there’s no better way to learn than by applying it to real-world use cases.
Final Words
Thank you for taking the time to read through my homelab journey!
Building and refining this setup has been a great source of learning and fun, and I’m always looking for new ways to improve it.
If you’ve got ideas, feedback, better solutions, or just want to share your own setup, I’d love to hear from you. Drop me a message, challenge my choices, or inspire me with your story!