Intro
In my apartment I have a Daikin air conditioning system, to cool it down in summer, but also warm it up in winter. It is composed of 3 indoor units:
- Living room
- Master bedroom
- Hallway (in front of my office and my kid’s room)
I always find it boring to have to turn them on when I needed, I forgot to turn them off when I should and I was constantly chasing the remote.
What if I could automate it? After all, I already use Home Assistant to control many devices at home, controlling the AC seems natural to me.
Home Assistant
Home Assistant is the brain of my smart home. It connects all my devices (lights, sensors, shutters, etc.) under a single interface. What makes it so powerful is the ability to create automations: if something happens, then do something else. Simple things like “turn on the kitchen light when the motion sensor is triggered” are a breeze. For more advanced workflows, it offers YAML-based scripts with conditions, delays, triggers, and templates.
That said, once automations start getting more complex, like reacting to multiple sensors, time ranges, or presence detection, they can quickly turn into long, hard-to-follow blocks of code. It’s easy to lose track of what does what, especially when you want to tweak just one small part weeks later.
Node-RED
That’s exactly why I turned to Node-RED. It’s a visual tool that lets you build logic using blocks called “nodes”, which you connect with wires to create flows. Each node performs a small task: trigger at a certain time, check a condition, send a command to a device, etc. Instead of writing YAML, you just drag, drop, and connect.
Node-RED does not replace Home Assistant, it empowers it. I won’t cover the installation of Node-RED neither the integration in HA, I’ve done that 2 years ago, but for that I remember, this is quite straightforward.
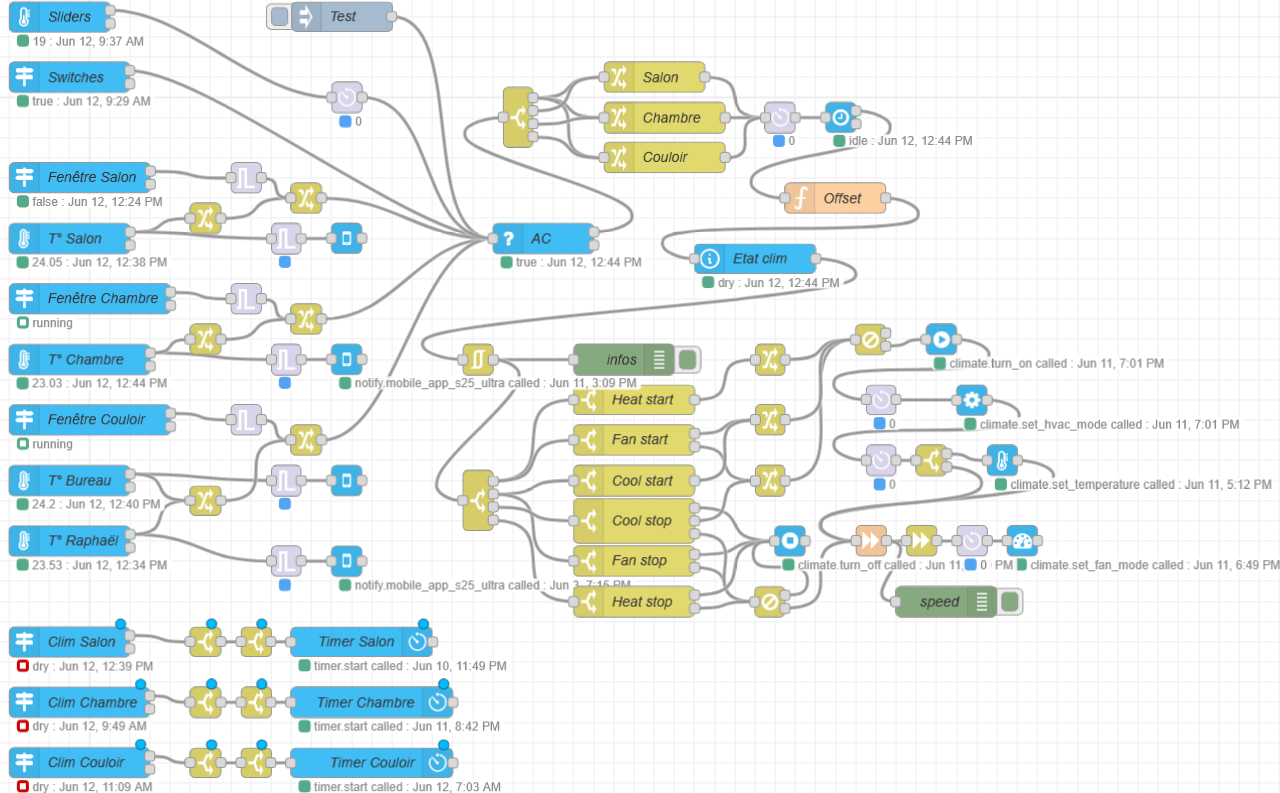
Previous Workflow
I was already having a good solution to control my AC from Home Assistant with Node-RED, but I wanted to enhance it to also handle the humidity level at home. My current workflow, despite being functional, was not really scalable and quite hard to maintain:
New Workflow
Instead of tweaking this workflow, I created a new one from scratch, with the same goal in mind: control the AC system by taking into account all available sensors: thermometers, humidity, door sensors, occupant presence, time of day, etc.
Objectives
The idea is pretty simple: do not having to think about AC while still being efficient.
That being said, what does that mean? I want to keep the temperature and humidity level in check, whenever I’m here or not. If I open the windows, it should stop blowing. If it is too wet, I want to dry the air. If I turn the AC on or off manually, I don’t want it to overwrite my setting. If it’s night, I don’t need to cool my living-room and I want it quiet, etc.
To help me achieve that, I’m using 4 Aqara temperature and humidity sensors, one in each of my main room. I’m also using some [Aqara door sensors](https://eu.aqara.com/en-eu/products/aqara-door-and-window-sensor, to detect it windows are open.
Workflow
Let me introduce my new AC workflow within Node-RED and explain what it does in detail:
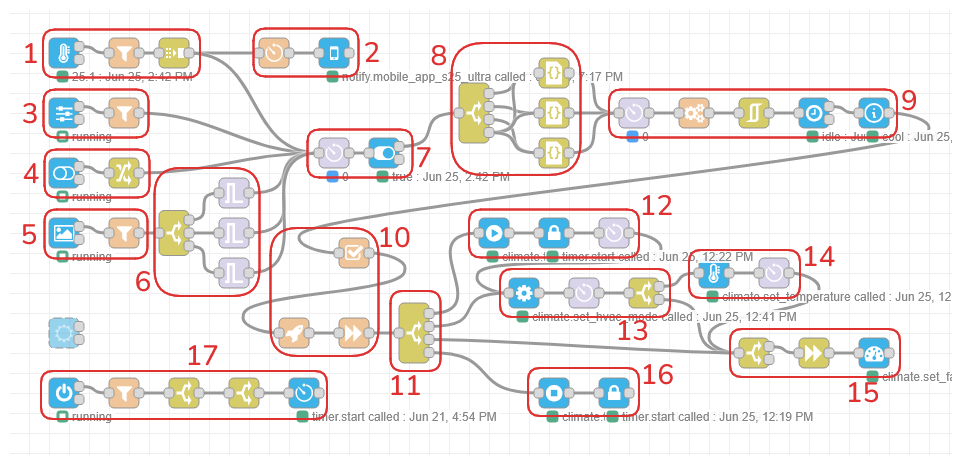
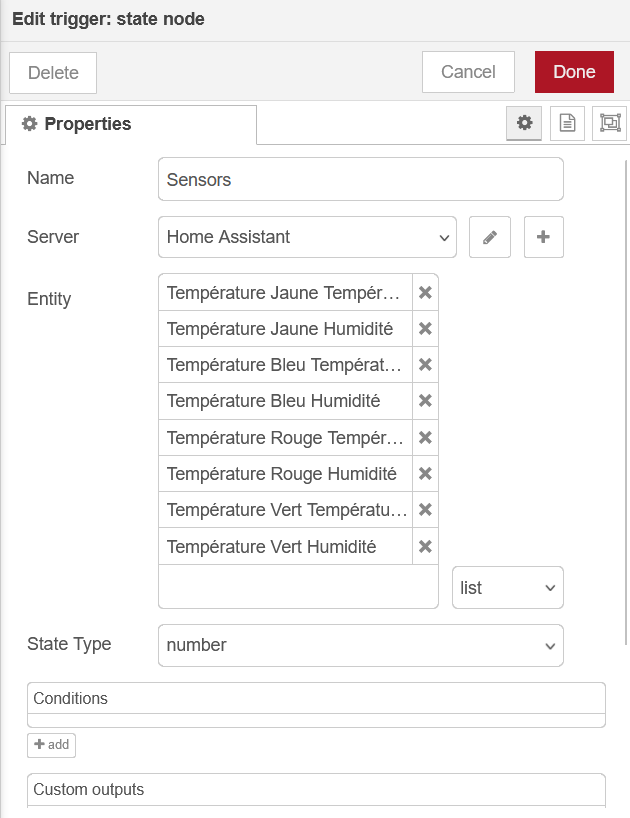
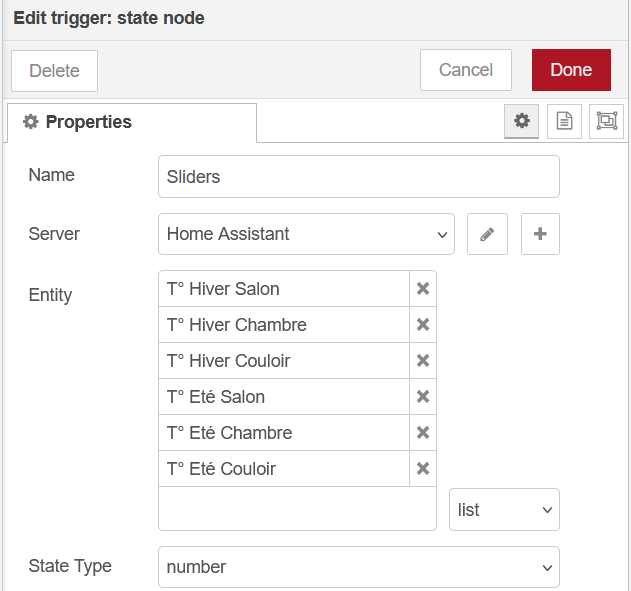
1. Temperature Sensors
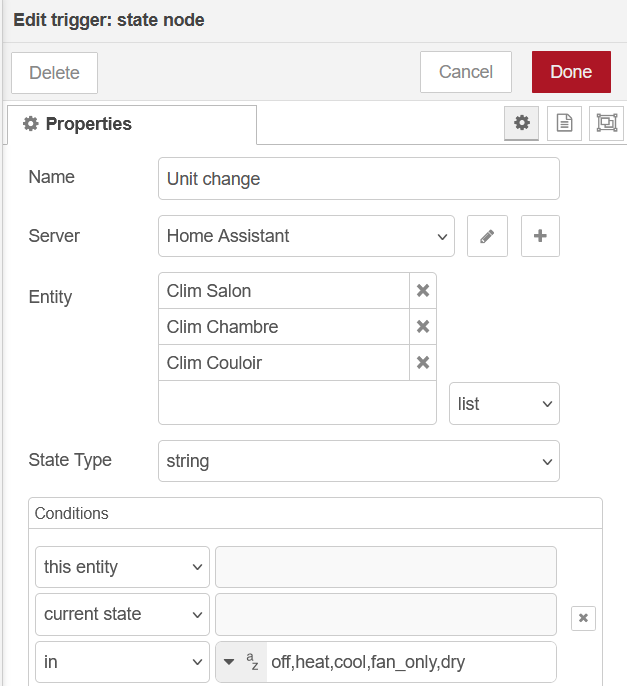
In the first node, I combined all the temperature sensors together in one trigger state node, but I also added humidity levels in addition to the temperature, managed by the sensor. The node then contains 8 entities in a list (2 for each of my sensor). Each time one value change out of these 8 entities, the node is triggered:
Each of my temperature sensors are named with a color in French, because each has its own color sticker to distinguish them:
- Jaune: Living room
- Bleu: Bedroom
- Rouge: Office
- Vert: Kid’s bedroom
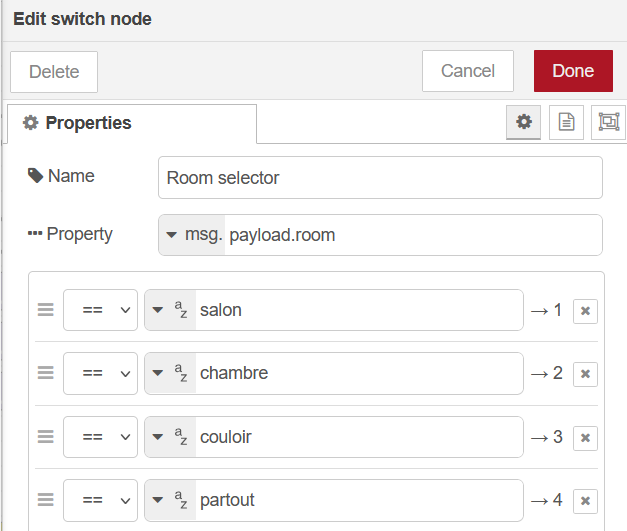
The second node is a function node which has the role the determine the room of the sensor (function node is written in JavaScript):
const association = {
    "temperature_jaune": "salon",
    "temperature_bleu": "chambre",
    "temperature_rouge": "couloir",
    "temperature_vert": "couloir"
};

// Match pattern like: sensor.temperature_rouge_temperature
const match = msg.topic.match(/^sensor\.(.+)_(temperature|humidity)$/);

if (!match) {
    node.warn("Topic format not recognized: " + msg.topic);
    return null;
}

msg.payload = {
    room: association[match[1]],
    sensor: match[1]
};

return msg;
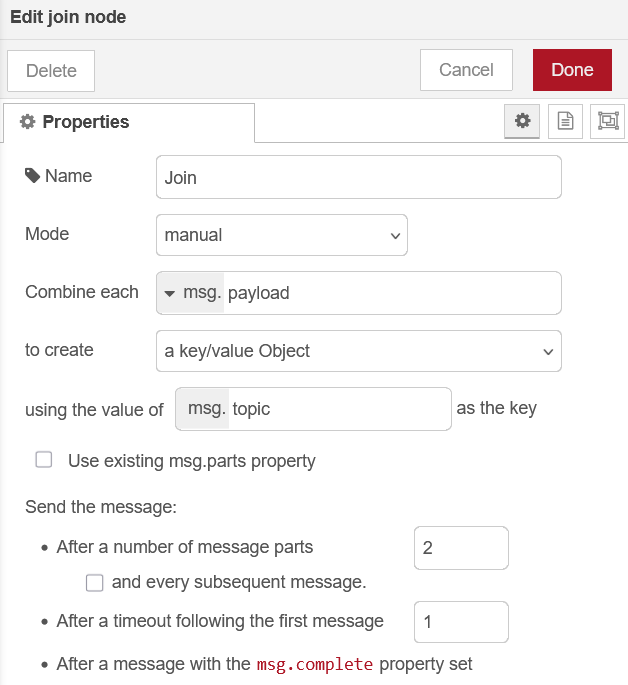
For the last node, most of the time, the sensors will send two messages at the same time, one containing the temperature value and the other, the humidity level. I added a join node to combined the two messages if they are sent within the same second:
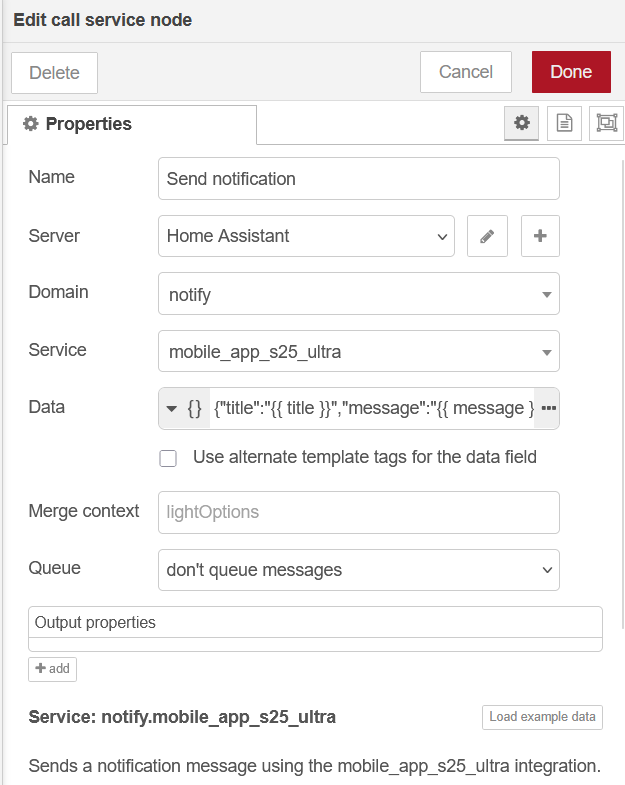
2. Notification
It can happen that the temperature sensors are not sending states anymore for some reason. In that case, they will always return their last value, which would lock the associated AC unit.
The workaround I found effective is to send a notification if the sensor did not send a new value in the last 3 hours. In normal situation, the sensor send an update approximately every 15 minutes.
The first node is a function node a bit tricky which will generate flow variable as timer for each sensor. When the timeout is reach, it sends a message to the next node:
const sensor = msg.payload.sensor;
const timeoutKey = `watchdog_${sensor}`;
const messages = {
    "temperature_jaune": {"title": "Température Salon", "message": "Capteur de température du salon semble hors service"},
    "temperature_bleu": {"title": "Température Chambre", "message": "Capteur de température de la chambre semble hors service"},
    "temperature_rouge": {"title": "Température Bureau", "message": "Capteur de température du bureau semble hors service"},
    "temperature_vert": {"title": "Température Raphaël", "message": "Capteur de température de Raphaël semble hors service"}
};

// Clear existing timer
const existing = flow.get(timeoutKey);
if (existing) clearTimeout(existing);

// Set new timer
const timer = setTimeout(() => {
    node.send({
        payload: `⚠️ No update from ${sensor} in 3 hours.`,
        sensor: sensor,
        title: messages[sensor]["title"],
        message: messages[sensor]["message"]
    });
}, 3 * 60 * 60 * 1000); // 3 hours

flow.set(timeoutKey, timer);

return null; // Don't send anything now
The second node is a call service node which send a notification on my Android device with the value given:
3. Temperature Sliders
To have a control over the temperature without having to change the workflow, I created two Home Assistant helper, as number, which I can adjust for each unit, giving me 6 helpers in total:
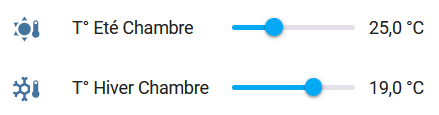
These values are the base temperature used for the calculation of the threshold, depending off the offset which I will detail further.
The first node is a trigger state node, with all 6 entities combined. If I change one value, the node is triggered:
The second node is a function node, to determine the room affected:
const association = {
    "input_number.temp_ete_salon": "salon",
    "input_number.temp_hiver_salon": "salon",
    "input_number.temp_ete_chambre": "chambre",
    "input_number.temp_hiver_chambre": "chambre",
    "input_number.temp_ete_couloir": "couloir",
    "input_number.temp_hiver_couloir": "couloir"
};

msg.payload = { room: association[msg.topic] };
return msg;
4. Toggles
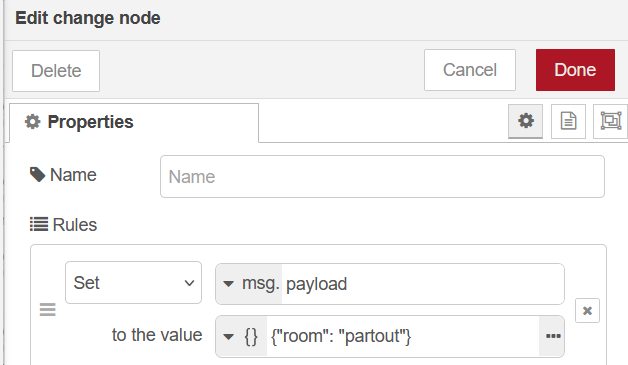
In Home Assistant, I’m using other helper but as boolean, the most important is the AC one, where I can manually disable the whole workflow. I have other which are automated, for the time of the day or for detect presence at home.
I have another trigger state node with all my toggles as boolean, including a test button, for debug purpose:

As toggles affect the whole apartment and not a single unit, the next node is a change node, which set the room value to partout (everywhere):
5. Windows
The last triggers are my windows, if I open or close a window next to my unit, it triggers the workflow. I have door sensor for some of my doors, but for the hallway unit, I’m using the Velux windows state. Some rooms have more than one, I created a group helper for them.
The first node is the last trigger state node, the returned value is a string which I will have to convert later into boolean:
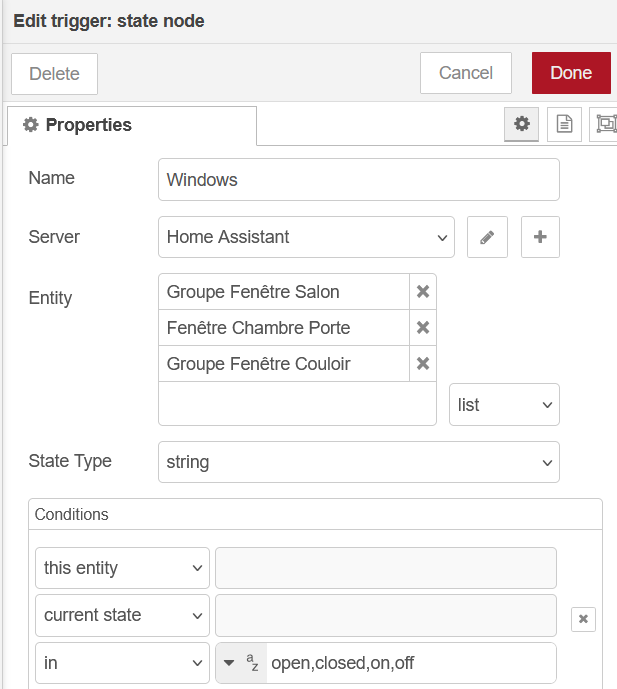
Connected to it, again a function node to select the affect room:
const association = {
    "binary_sensor.groupe_fenetre_salon": "salon",
    "binary_sensor.fenetre_chambre_contact": "chambre",
    "cover.groupe_fenetre_couloir": "couloir"
};

msg.payload = {
    room: association[msg.topic]
};
return msg;
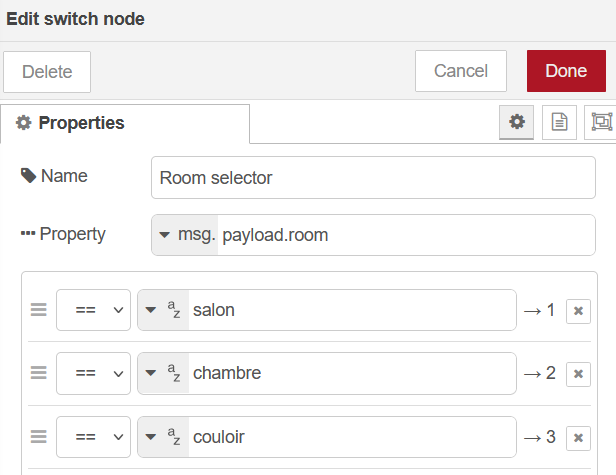
6. Window Watchdog
When I open a window, it is not necessarily to let it open for a long time. I could just let the cat out or having a look at my portal. I don’t want my AC tuned off as soon as open it. To workaround that I created a watchdog for each unit, to delay the message for some time.
The first node is a switch node, based on the room given by the previous node, it will send the message to the associated watchdog:
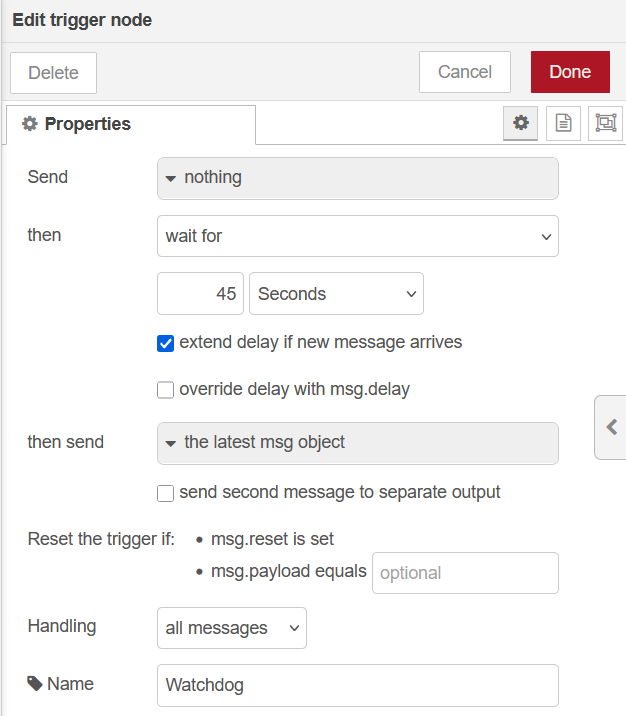
After are the watchdogs, trigger nodes, which will delay the message by some time and extend the delay if another message if received:
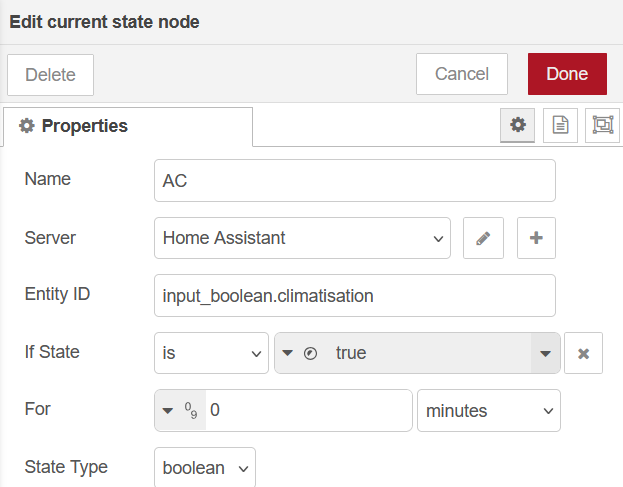
7. AC Enabled ?
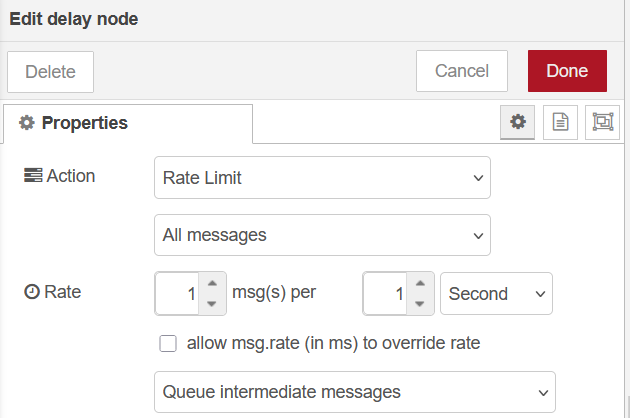
All these triggers are now entering the computing pipeline, to determine what the system must do with the action. But before, it is checking if the automation is even enabled. I add this kill switch, just in case, but I rarely use it anyway.
The first node is a delay node which regulate the rate of every incoming messages to 1 per second:
The second node is a current state node which checks if the climatisation boolean is enabled:
8. Room Configuration
The idea here is to attach the configuration of the room to the message. Each room have their own configuration, which unit is used, which sensors and more importantly, when should they be turned on and off.
AC units have 4 mode which can be used:
- Cool
- Dry
- Fan
- Heat
To determine which mode should be used, I’m using threshold for each mode and unit fan’s speed, with different offset depending the situation. I can then define a offset during the night or when I’m away. I can also set the offset to disabled, which will force the unit to shut down.
The first node is a switch node, based on the room value, which will route the message to the associated room configuration. When the room is partout (everywhere), the message is split to all 3 room configuration:
It is connected to a change node which will attach the configuration to the room_config, here an example with the living-room configuration:
{
    "threshold": {
        "cool": {
            "start": {
                "1": 1,
                "2": 1.5,
                "3": 2,
                "4": 2.5,
                "quiet": 0
            },
            "stop": -0.3,
            "target": -1,
            "offset": {
                "absent": 1,
                "vacances": "disabled",
                "fenetre": "disabled",
                "matin": "disabled",
                "jour": 0,
                "soir": 0,
                "nuit": "disabled"
            }
        },
        "dry": {
            "start": {
                "quiet": -1
            },
            "stop": -1.5,
            "offset": {
                "absent": "1.5",
                "vacances": "disabled",
                "fenetre": "disabled",
                "matin": "disabled",
                "jour": 0,
                "soir": 0,
                "nuit": "disabled"
            }
        },
        "fan_only": {
            "start": {
                "1": -0.3,
                "quiet": -0.5
            },
            "stop": -0.7,
            "offset": {
                "absent": "disabled",
                "vacances": "disabled",
                "fenetre": "disabled",
                "matin": "disabled",
                "jour": 0,
                "soir": 0,
                "nuit": "disabled"
            }
        },
        "heat": {
            "start": {
                "1": 0,
                "2": -1.5,
                "quiet": 0
            },
            "stop": 1,
            "target": 1,
            "offset": {
                "absent": -1.5,
                "vacances": -3,
                "fenetre": "disabled",
                "matin": 0,
                "jour": 0,
                "soir": 0,
                "nuit": -1.5
            }
        }
    },
    "unit": "climate.clim_salon",
    "timer": "timer.minuteur_clim_salon",
    "window": "binary_sensor.groupe_fenetre_salon",
    "thermometre": "sensor.temperature_jaune_temperature",
    "humidity": "sensor.temperature_jaune_humidity",
    "temp_ete": "input_number.temp_ete_salon",
    "temp_hiver": "input_number.temp_hiver_salon"
}
9. Computation
Now that the message has the room configuration attached, we are entering in the computation pipeline. We have the AC unit name, the sensor names, the desired base temperature and the offset to apply. From these values, we will fetch the current state and do the maths.
The first node is another delay node which regulate the rate of incoming messages, because the previous block could have created 3 messages in all rooms are targeted.
The second is the most important node of the workflow, a function node that has multiple tasks:
- Fetch sensor state for Home Assistant
- Calculate mode thresholds with given offset
- Disable modes if conditions are met
- Inject these values in the payload
// --- Helper: Get Home Assistant state by entity ID ---
function getState(entityId) {
    return global.get("homeassistant.homeAssistant.states")[entityId]?.state;
}

// --- Determine current time period based on sensors ---
const periods = ["jour", "soir", "nuit", "matin"];
msg.payload.period = periods.find(p => getState(`binary_sensor.${p}`) === 'on') || 'unknown';

// --- Determine presence status (absent = inverse of presence) ---
const vacances = getState("input_boolean.absent");
const absent = getState("input_boolean.presence") === 'on' ? 'off' : 'on';

/**
 * Recursively adds the base temperature and offset to all numeric start values in a threshold config
 */
function applyOffsetToThresholds(threshold, baseTemp, globalOffset) {
    for (const [key, value] of Object.entries(threshold)) {
        if (key === "offset") continue;

        if (typeof value === 'object') {
            applyOffsetToThresholds(value, baseTemp, globalOffset);
        } else {
            threshold[key] += baseTemp + globalOffset;
        }
    }
}

/**
 * Calculates the global offset for a mode, based on presence, vacation, window, and time of day
 */
function calculateGlobalOffset(offsets, modeName, windowState, disabledMap) {
    let globalOffset = 0;

    for (const [key, offsetValue] of Object.entries(offsets)) {
        let conditionMet = false;

        if (key === msg.payload.period) conditionMet = true;
        else if (key === "absent" && absent === 'on') conditionMet = true;
        else if (key === "vacances" && vacances === 'on') conditionMet = true;
        else if ((key === "fenetre" || key === "window") && windowState === 'on') conditionMet = true;

        if (conditionMet) {
            if (offsetValue === 'disabled') {
                disabledMap[modeName] = true;
                return 0; // Mode disabled immediately
            }

            globalOffset += parseFloat(offsetValue);
        }
    }

    return globalOffset;
}

/**
 * Main logic: compute thresholds for the specified room using the provided config
 */
const cfg = msg.payload.room_config;
const room = msg.payload.room;

// Normalize window sensor state
const rawWindow = getState(cfg.window);
const window = rawWindow === 'open' ? 'on' : rawWindow === 'closed' ? 'off' : rawWindow;

// Gather temperatures
const temps = cfg.thermometre.split(',')
    .map(id => parseFloat(getState(id)))
    .filter(v => !isNaN(v));

const temp_avg = temps.reduce((a, b) => a + b, 0) / temps.length;
const temp_min = Math.min(...temps);
const temp_max = Math.max(...temps);

// Gather humidity
const humidities = cfg.humidity.split(',')
    .map(id => parseFloat(getState(id)))
    .filter(v => !isNaN(v));

const humidity_avg = humidities.reduce((a, b) => a + b, 0) / humidities.length;
const humidity_min = Math.min(...humidities);
const humidity_max = Math.max(...humidities);

// Get base temps
const temp_ete = parseFloat(getState(cfg.temp_ete));
const temp_hiver = parseFloat(getState(cfg.temp_hiver));

// Process modes
const { threshold } = cfg;
const modes = ["cool", "dry", "fan_only", "heat"];
const disabled = {};

for (const mode of modes) {
    const baseTemp = (mode === "heat") ? temp_hiver : temp_ete;
    const globalOffset = calculateGlobalOffset(threshold[mode].offset, mode, window, disabled);

    applyOffsetToThresholds(threshold[mode], baseTemp, globalOffset);
}

// Final message
msg.payload = {
    ...msg.payload,
    unit: cfg.unit,
    timer: cfg.timer,
    threshold,
    window,
    temp: {
        min: temp_min,
        max: temp_max,
        avg: Math.round(temp_avg * 100) / 100
    },
    humidity: {
        min: humidity_min,
        max: humidity_max,
        avg: Math.round(humidity_avg * 100) / 100
    },
    disabled
};

return msg;
The third node is a filter node, which drops subsequent messages with similar payload:

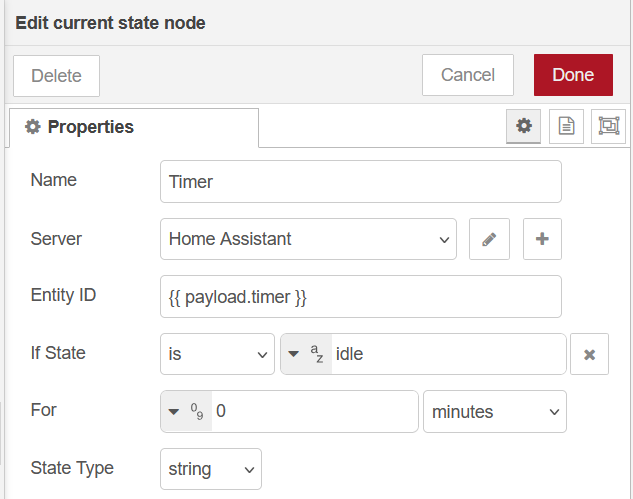
The fourth node checks if any lock is set, with a current state node, we verify if the timer associated to the unit is idle. If not, the message is discarded:
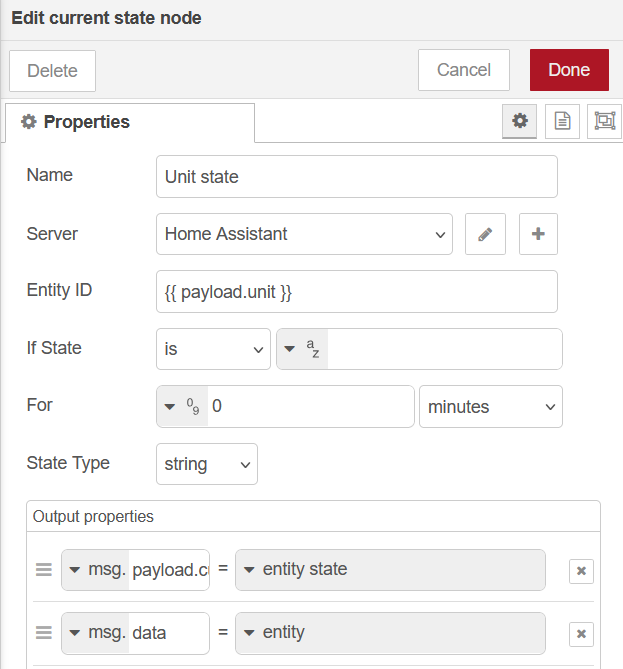
The last node is another current state node which will fetch the unit state and properties:
10. Target State
After the computation, we want to determine what should be the target mode, what action to do to converge from the current mode and, if apply, what should be the fan’s speed for that mode.
All three nodes are function nodes, the first one decides what should be the target mode, between: off, cool, dry, fan_only and heat:
const minHumidityThreshold = 52;
const maxHumidityThreshold = 57;

// Helper: check if mode can be activated or stopped
function isModeEligible(mode, temps, humidity, thresholds, currentMode) {
    const isCurrent = (mode === currentMode);
    const threshold = thresholds[mode];

    if (msg.payload.disabled?.[mode]) return false;

    // Determine which temperature to use for start/stop:
    // start: temp.max (except heat uses temp.min)
    // stop: temp.avg
    let tempForCheckStart;
    if (mode === "heat") {
        tempForCheckStart = temps.min;  // heat start uses min temp
    } else {
        tempForCheckStart = temps.max;  // others start use max temp
    }
    const tempForCheckStop = temps.avg;

    // Dry mode also depends on humidity thresholds
    // humidity max for start, humidity avg for stop
    let humidityForCheckStart = humidity.max;
    let humidityForCheckStop = humidity.avg;

    // For heat mode (inverted logic)
    if (mode === "heat") {
        if (!isCurrent) {
            const minStart = Math.max(...Object.values(threshold.start));
            return tempForCheckStart < minStart;
        } else {
            return tempForCheckStop < threshold.stop;
        }
    }

    // For dry mode (humidity-dependent)
    if (mode === "dry") {
        // Skip if humidity too low
        if (humidityForCheckStart <= (isCurrent ? minHumidityThreshold : maxHumidityThreshold)) return false;

        const minStart = Math.min(...Object.values(threshold.start));
        if (!isCurrent) {
            return tempForCheckStart >= minStart;
        } else {
            return tempForCheckStop >= threshold.stop;
        }
    }

    // For cool and fan_only
    if (!isCurrent) {
        const minStart = Math.min(...Object.values(threshold.start));
        return tempForCheckStart >= minStart;
    } else {
        return tempForCheckStop >= threshold.stop;
    }
}

// --- Main logic ---
const { threshold, temp, humidity, current_mode, disabled } = msg.payload;

const priority = ["cool", "dry", "fan_only", "heat"];
let target_mode = "off";

// Loop through priority list and stop at the first eligible mode
for (const mode of priority) {
    if (isModeEligible(mode, temp, humidity, threshold, current_mode)) {
        target_mode = mode;
        break;
    }
}

msg.payload.target_mode = target_mode;

if (target_mode === "cool" || target_mode === "heat") {
  msg.payload.set_temp = true;
}

return msg;
The second compares the current and target node and pick which action to take:
- check: current and target are the same.
- start: the AC unit is currently off, but the target is different.
- change: the AC unit is on, the target mode is different, but not
off. - stop: the AC unit is on and it is required to stop it.
let action = "check"; // default if both are same

if (msg.payload.current_mode === "off" && msg.payload.target_mode !== "off") {
    action = "start";
} else if (msg.payload.current_mode !== "off" && msg.payload.target_mode !== "off" && msg.payload.current_mode !== msg.payload.target_mode) {
    action = "change";
} else if (msg.payload.current_mode !== "off" && msg.payload.target_mode === "off") {
    action = "stop";
}

msg.payload.action = action;
return msg;
The last node determines the fan’s speed of the target mode based on thresholds:
// Function to find the appropriate speed key based on temperature and mode
function findSpeed(thresholdStart, temperature, mode) {
  let closestSpeed = 'quiet';
  let closestTemp = mode === 'heat' ? Infinity : -Infinity;

  for (const speedKey in thresholdStart) {
    if (speedKey !== 'quiet') {
      const tempValue = thresholdStart[speedKey];
      if (mode === 'heat') {
        if (tempValue >= temperature && tempValue <= closestTemp) {
          closestSpeed = speedKey;
          closestTemp = tempValue;
        }
      } else { // cool, fan_only
        if (tempValue <= temperature && tempValue >= closestTemp) {
          closestSpeed = speedKey;
          closestTemp = tempValue;
        }
      }
    }
  }
  return closestSpeed;
}

if (msg.payload.target_mode && msg.payload.target_mode !== "off" && msg.payload.target_mode !== "dry") {
  const modeData = msg.payload.threshold[msg.payload.target_mode];
  if (modeData && modeData.start) {
    if (msg.payload.target_mode === "heat") {
      msg.payload.speed = findSpeed(modeData.start, msg.payload.temp.min, 'heat');
    } else {
      msg.payload.speed = findSpeed(modeData.start, msg.payload.temp.max, 'cool');
    }
  } else {
    node.error("Invalid mode data or missing 'start' thresholds", msg);
  }
} else {
  // No need for speed in 'off' or 'dry' modes
  msg.payload.speed = null;
}

return msg;
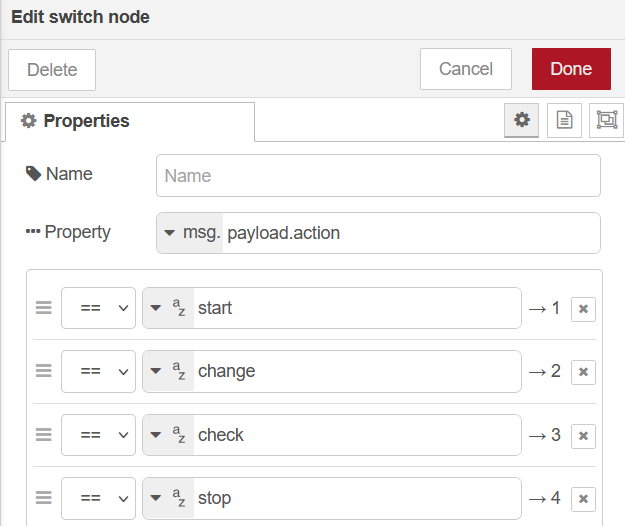
11. Action Switch
Based on the action to take, the switch node will route the message accordingly:
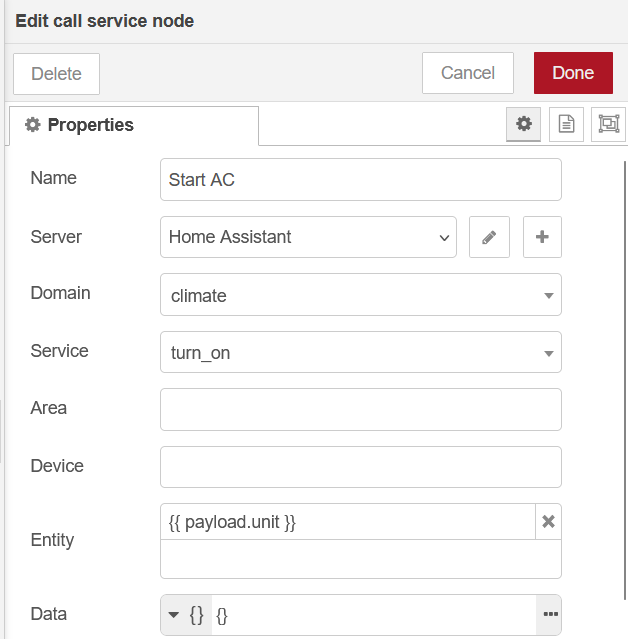
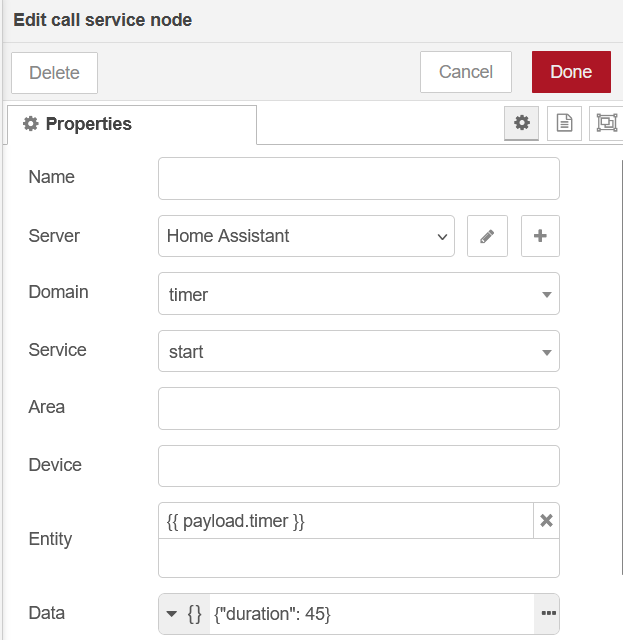
12. Start
When the action is start, we first need to turn the unit online, while this takes between 20 to 40 seconds depending on the unit model, it is also locking the unit for a short period for future messages.
The first node is a call service node using the turn_on service on the AC unit:
The second node is another call service node which will start the lock timer of this unit for 45 seconds:
The last one is a delay node of 5 seconds, to give the time to the Home Assistant Daikin integration to resolve the new state.
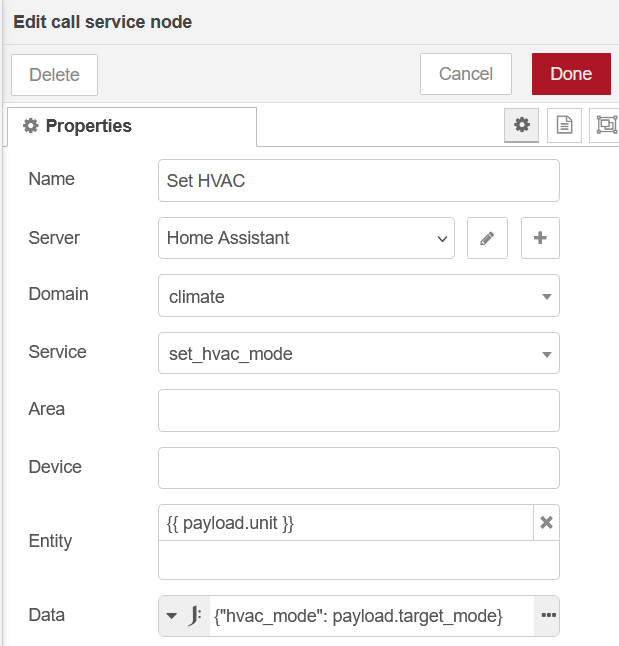
13. Change
The change action is used to change from one mode to another, but also used right after the start action.
The first node is a call service node using the set_hvac_mode service on the AC unit:
The following node is another delay of 5 seconds.
The last one verify with a switch node if the target temperature needs to be set, this is only required for the modes cool and heat:
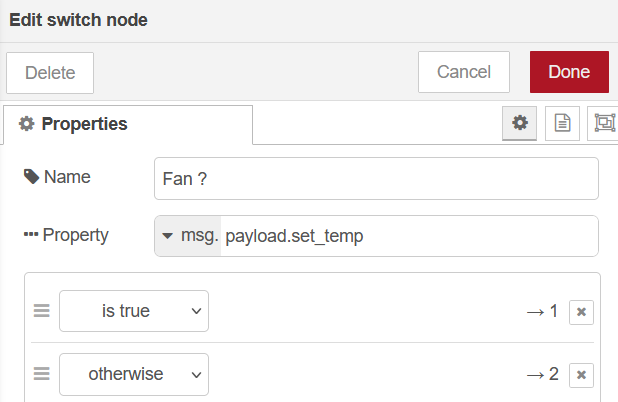
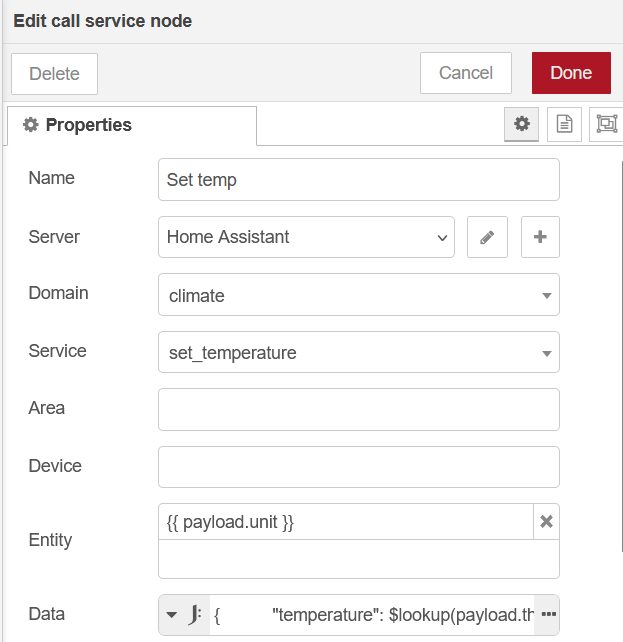
14. Set Target Temperature
The target temperature is only relevant for cool and heat mode, when you use a normal AC unit, you define a temperature to reach. This is exactly what is defined here. But because each unit is using its own internal sensor to verify, I don’t trust it. If the value is already reached, the unit won’t blow anything.
The first node is another call service node using the set_temperature service:
Again, this node is followed by a delay node of 5 seconds
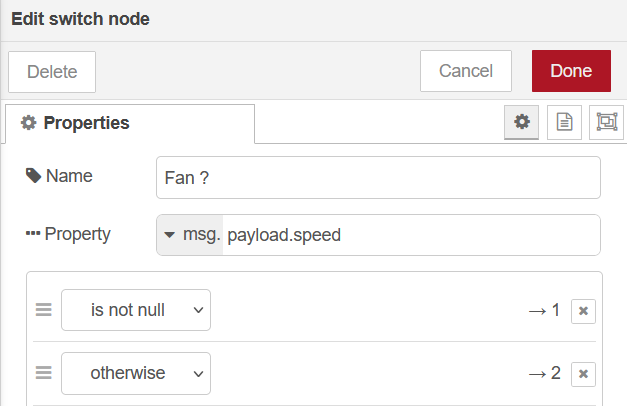
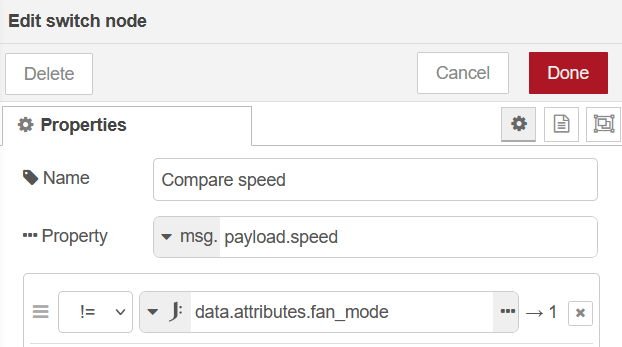
15. Check
The check action is almost used everytime, it is actually only checks and compare the desired fan speed, it changes the fan speed if needed.
The first node is a switch node which verify if the speed is defined:
The second is another switch node to compare the speed value with the current speed:
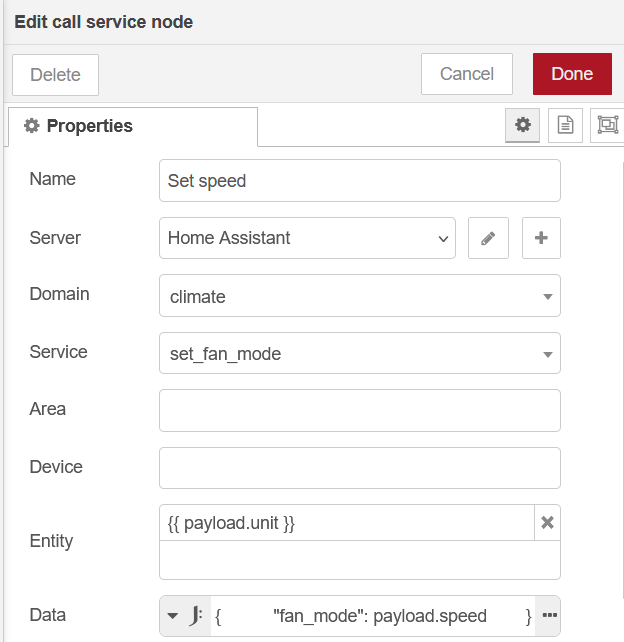
Finally the last node is a call service node using the set_fan_mode to set the fan speed:
16. Stop
When the action is stop, the AC unit is simply turned off
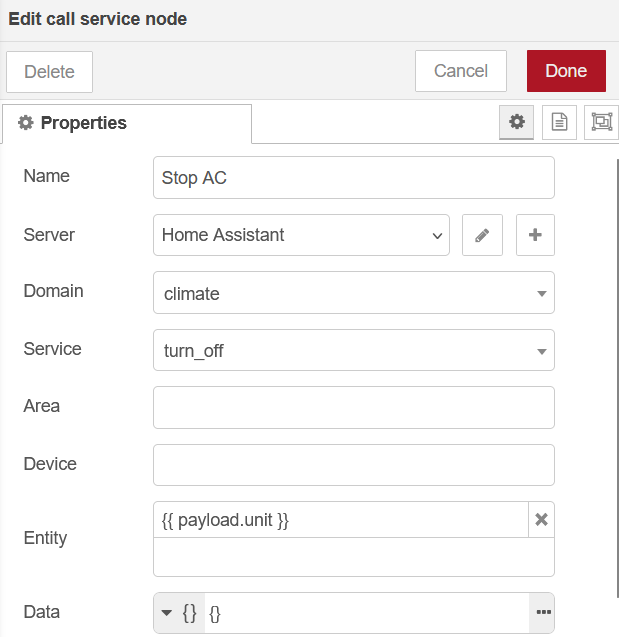
The first node is a call service noded using the service turn_off:
The second node is another call service node which will start the lock timer of this unit for 45 seconds
17. Manual Intervention
Sometime, for some reason, we want to use the AC manually. When we do, we don’t want the workflow to change our manual setting, at least for some time. Node-RED is using its own user in Home Assistant, so when an AC unit change state without this user, this was manually done.
The first node is a trigger state node, which will send a message when any AC unit is changing state:
The second is a function node which willassociate the unit with its timer:
const association = {
    "climate.clim_salon": "timer.minuteur_clim_salon",
    "climate.clim_chambre": "timer.minuteur_clim_chambre",
    "climate.clim_couloir": "timer.minuteur_clim_couloir"
};

msg.payload = association[msg.topic];
return msg;
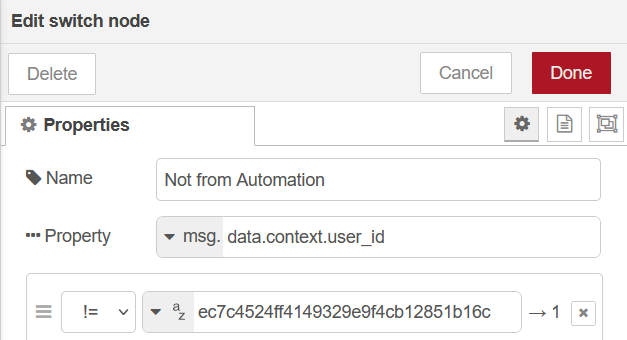
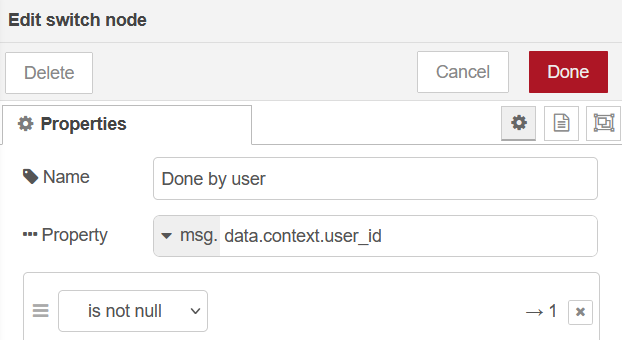
The third is a switch node that will let through the message when the user_id is not the Node-RED user’s one:
The fourth is another switch node which checks if there are any user_id:
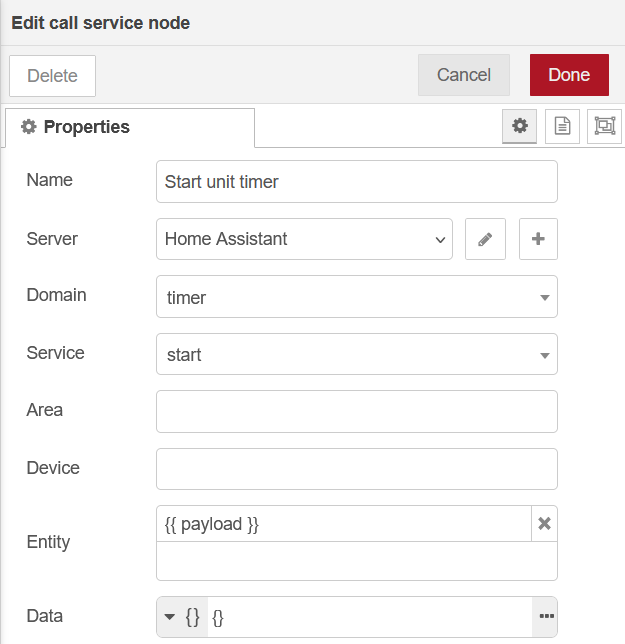
Lastly, the final node is a call service node using start service on the unit’s timer with its default duration (60 minutes):
TL;DR
With this setup, my AC system is fully automated, from cooling in summer to warming in winter, while keeping in check the humidity level.
This required quite a lot of thinking, tweaking and testing, but finally I’m now very happy with the results, that’s why I’m sharing it with you, to give you some ideas about what you can do in home automation.
If you think I could have done things differently, please reach out to me to discuss about it, do not hesitate to share your ideas as well!